
Our Blog

How Much Home Can You Afford in Today’s Market?
One of the biggest questions homebuyers ask is simple—but incredibly important:“How much home can I actually afford?”With today’s higher home prices and interest rates, understanding your true...
Read more

Current Mortgage Rate Outlook and What It Means for Buyers Today
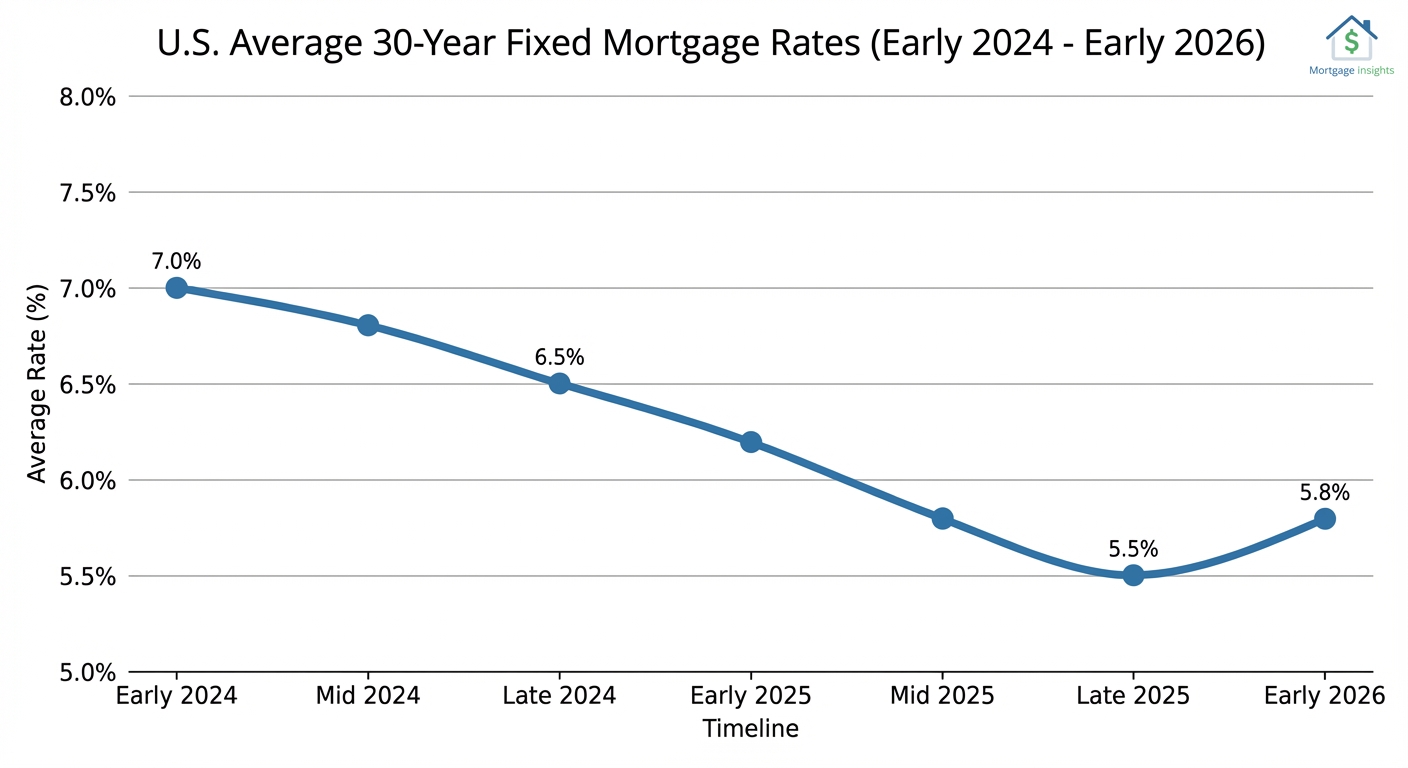
Mortgage rates in 2026 continue to hover in the mid‑6% range, and while that may feel high compared to the ultra‑low rates of a few years ago, today’s market is much more stable and predictable....
Read more

Should You Buy Now or Wait for Mortgage Rates to Drop?
It’s one of the biggest questions in today’s housing market: should you buy now, or wait for mortgage rates to come down?With rates hovering in the mid-6% range in 2026, it’s natural to wonder if...
Read more

What Economists Are Predicting for Mortgage Rates in 2026
Most housing economists agree on one key point: mortgage rates are expected to remain in the 6% range for most of 2026, with gradual easing rather than dramatic drops. While rates have improved...
Read more

Should I Buy a House Now or Wait? Understanding the Cost of Waiting
One of the most common questions buyers ask today is whether they should buy a home now or wait for mortgage rates to drop. While it’s tempting to hold out for the “perfect” rate, timing the...
Read more
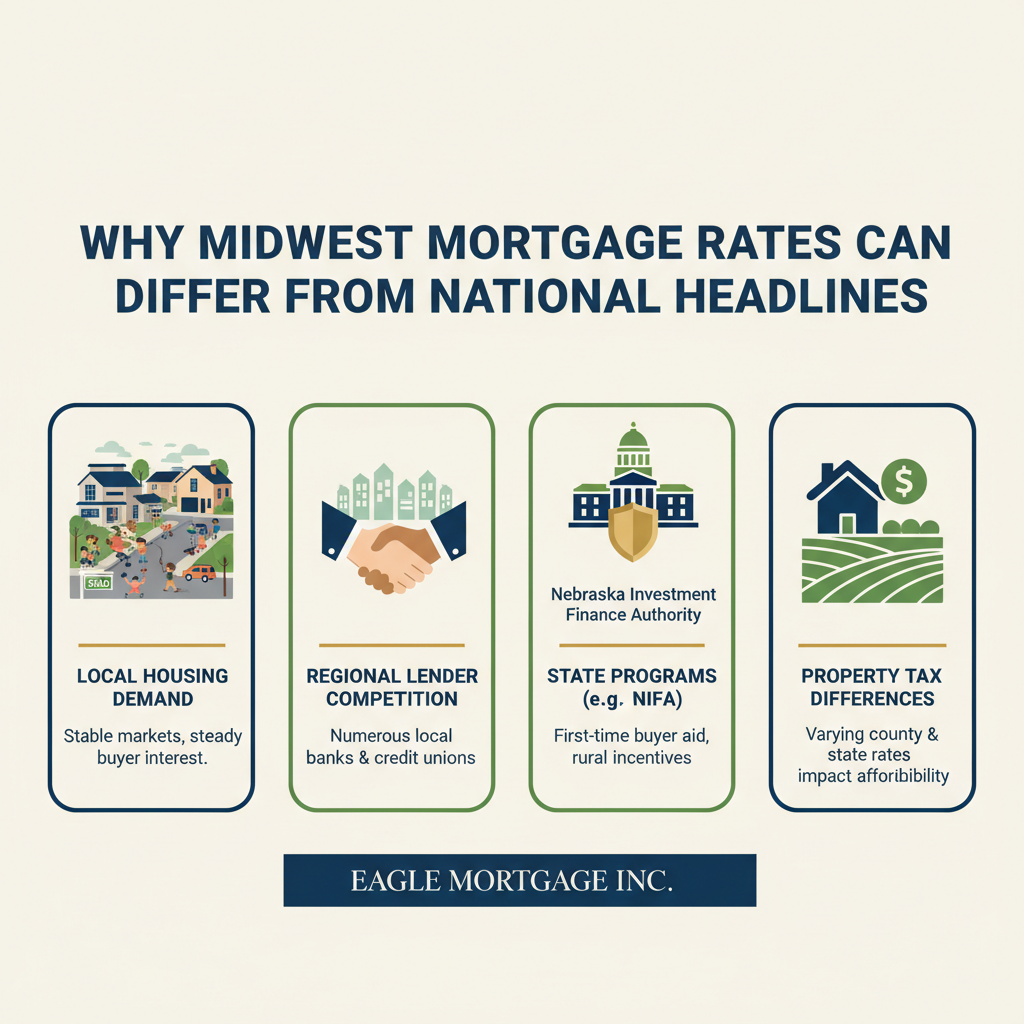
Why Midwest Mortgage Rates Can Differ From National Headlines
If you’ve been keeping an eye on mortgage news, you’ve likely seen headlines announcing that rates are up… down… or changing overnight. But many buyers in Nebraska and Iowa are surprised when the...
Read more
Why Two Buyers With the Same Income Get Different Loans
It surprises a lot of buyers: two people can earn the same salary, apply at the same time, and still qualify for very different mortgage options.Income matters — but it’s only one piece of the...
Read more
Why Waiting for “Perfect” Rates Can Backfire: A Nebraska & Iowa Buyer Perspective
Many buyers in Nebraska and Iowa are saying the same thing right now: “We’re just going to wait until rates drop.” While that sounds like a safe, logical move, waiting for the “perfect” mortgage...
Read more

Things TikTok Mortgage Advice Gets Wrong
TikTok is great for home inspiration, quick tips, and entertainment — but when it comes to mortgages, viral advice can be misleading, incomplete, or just plain wrong. Here are some of the biggest...
Read more

Understanding Interest Rates & Mortgage Preapproval
The Home-Buying Process and Mortgage PreapprovalEmbarking on the journey to purchasing a home is both exciting and complex. Navigating the real estate market requires not only finding the right...
Read more
Should I Refinance My Mortgage? Here’s How to Know if It Makes Sense
Refinancing your mortgage can be a smart financial move—depending on your goals and current situation. With interest rates, home values, and personal finances always shifting, many homeowners...
Read more

Housing Market Update: Nebraska & Iowa — Early 2026
The Midwest housing market is off to an interesting start in 2026. Nationwide, buyers and sellers are adjusting to shifting mortgage rates, tight inventory, and ongoing affordability challenges....
Read more

Things to Think About With Your Home in January
January is one of the most important months for home maintenance. Cold temperatures, snow, ice, and more time spent indoors can put extra strain on your home. Taking a little time now to check a...
Read more
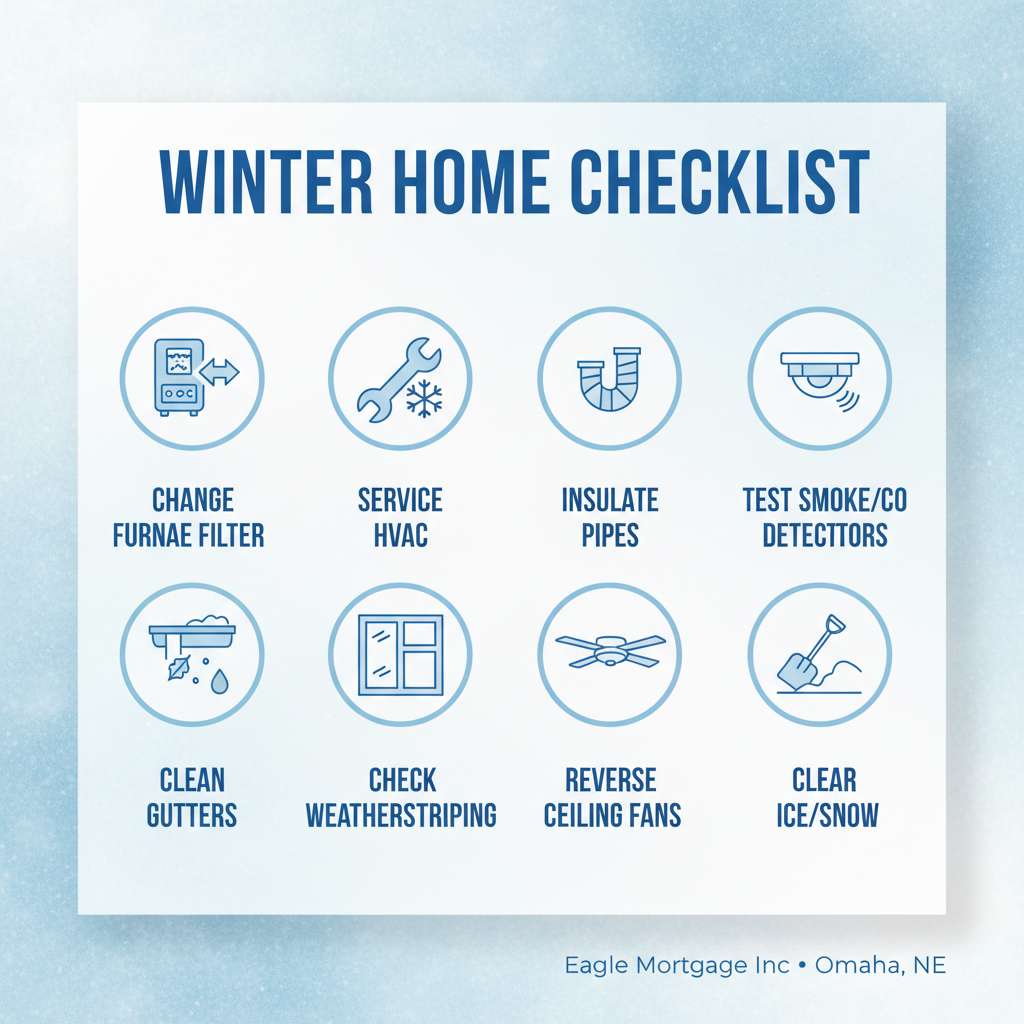
The Best Home Maintenance Tips to Prepare for Winter
Winter can be tough on your home, but a little preparation goes a long way. Cold temperatures, snow, and ice can cause costly damage if your home isn’t ready. By tackling a few key maintenance...
Read more

Best and Cheapest Home Improvement Ideas for Winter
Winter is an ideal time to tackle affordable home improvements. Cold weather often reveals drafts, insulation gaps, and energy inefficiencies—but the good news is that many fixes are low‑cost, DIY...
Read more

Mortgage Market Snapshot: What This Week’s MBA Data Means for Homebuyers and Homeowners
The latest Mortgage Bankers Association (MBA) data shows renewed momentum in the mortgage market, driven largely by refinances as rates hover near year-to-date lows. Whether you're buying,...
Read more

Mortgage Rates Today and Where They’re Headed Next
The mortgage market is shifting again — and if you’re thinking about buying, refinancing, or simply keeping an eye on the housing landscape, staying informed has never been more important. This...
Read more

🏡 Mortgage Tips for the Holiday Season: What Homebuyers & Homeowners Should Know
The holiday season is filled with family, celebrations, and travel—but it’s also an unexpectedly great time to think about your mortgage. Whether you’re planning to buy a home, refinance, or simply...
Read more

The Most Interesting Thing About Mortgages (That No One Talks About)
When most people think about mortgages, they consider interest rates, monthly payments, and the stress of closing day. But mortgages hide something far more fascinating—something that impacts not...
Read more

How to Improve Your Credit Score Before Buying a Home
Buying a home is one of the biggest financial decisions most people will ever make—your credit score plays a major role in that process. A stronger score can help you qualify for better mortgage...
Read more

Home Buying Tip: How to Prepare for a Mortgage
🏡 Home Buying Tips 2025: How to Prepare for a MortgageBuying a home in 2025 can feel overwhelming, especially for first-time buyers. The good news? With the right preparation, you can make the...
Read more

Mortgage Rate Trends in 2025: What’s Happening and What’s Next
Mortgage rates have been one of the most closely watched numbers in the housing market this year. After the rollercoaster of the past few years — from record lows to multi-decade highs — 2025 has...
Read more

Understanding Nebraska's 2025 Housing Market Dynamics
The housing market in Nebraska is experiencing modest growth, with unique dynamics influencing buyer and seller interactions. Here’s a closer look at the current landscape:Current Market...
Read more

How Economic Factors Affect Mortgage Rates
When you're in the market for a new home or considering refinancing your mortgage, one of the most important things you'll look at is the mortgage interest rate. But have you ever wondered why...
Read more

Markets Are Forward-Looking — Don’t Misread the Fed Cut Effect
🧭 Market Insight of the Week“Markets don’t wait for the Fed — they anticipate it.” Too often, analysts and headlines assess the effect of a Fed rate cut starting from the date of the actual...
Read more

How Your Credit Score Affects Mortgage Interest Rates
The Importance of Your Credit ScoreYour credit score plays a major role in determining the interest rate you’re offered on a mortgage. Here's how it works:🔢 Higher Credit Score = Lower Interest...
Read more

10 Smart Tips for Buying a Home in the Fall
Why Fall is a Great Time to BuyFall is often overlooked in the home-buying calendar, but savvy buyers know it can be one of the best times of the year to make a move. With less competition and...
Read more

Understanding the Current Mortgage Interest Rate Trends
Exploring Mortgage Interest Rates in 2025The current landscape of mortgage interest rates is shaped by a variety of economic factors, including inflation, the Federal Reserve's policies, and the...
Read more

Essential Fall Maintenance Tips for Your Home
As the leaves begin to change and cooler temperatures set in, it's the perfect time to prepare your home for the fall season. Proper maintenance during autumn can prevent costly repairs and...
Read more

How Economics Influence Mortgage Rates
Understanding the factors that influence mortgage rates is vital for anyone considering investing in real estate or refinancing their home. Mortgage rates are not just arbitrary numbers set by...
Read more

Funny Mortgage Facts You Didn't Know
Surprising Facts About MortgagesThe world of mortgages isn't all dry contracts and interest rates. Dig a little deeper, and you'll find some quirky and amusing facts about these financial...
Read more

Is Refinancing to Consolidate Debt a Smart Move?
Understanding Mortgage Refinancing for Debt ConsolidationRefinancing your mortgage to consolidate debt can be a strategic financial decision, but it's important to understand the process and its...
Read more

Navigating 30 vs. 15-Year Fixed Rate Mortgages
Decoding 30 vs. 15-Year Mortgages in 2025With homebuyers grappling with high interest rates in 2025, the decision between a 30-year and a 15-year fixed-rate mortgage feels more complex than ever....
Read more

Understanding Mortgage Points: A Guide for Homebuyers
What Are Mortgage Points?Mortgage points, sometimes called discount points, are fees you pay directly to the lender at closing in exchange for a reduced interest rate. This process is also known as...
Read more

Understanding How Mortgages Work
What is a Mortgage?A mortgage is a loan specifically used to purchase or maintain a home or a real estate property. The borrower agrees to pay back the loan over time, typically through monthly...
Read more

Understanding Mortgage Refinancing Rates
What Influences Refinancing Rates?Refinancing rates are primarily influenced by economic factors like inflation, the Federal Reserve's monetary policy, and the overall health of the economy....
Read more

When Should You Refinance Your Mortgage?
Understanding Mortgage RefinancingRefinancing your mortgage can be a strategic financial move, but it's crucial to assess whether it is the right time for you. Refinancing essentially means...
Read more

How to Successfully Refinance Your Mortgage
Understanding Mortgage RefinancingRefinancing a mortgage involves replacing your current home loan with a new one, usually to take advantage of improved interest rates, change the loan term, or tap...
Read more

What Kind of Mortgage is the Best Fit?
When selecting a mortgage, there is no universal solution since the choice largely depends on individual circumstances and financial goals. Here are some points to consider to determine the best...
Read more

How Much of a Mortgage Can I Afford?
Introduction Understanding how much mortgage you can afford is a critical step towards homeownership. It's about balancing your desires with practical financial decisions to ensure that your...
Read more

Buying a Home with No Down Payment: A Practical Guide
Introduction to No Down Payment Mortgages Buying a home is a significant financial commitment, and for many, saving enough for a down payment can be a daunting hurdle. Fortunately, there are...
Read more

How Mortgage Calculators Empower Homebuyers
Understanding Mortgage CalculatorsMortgage calculators are essential tools for anyone entering the home-buying process or considering refinancing options. These digital tools help prospective...
Read more

Exploring Mortgage Options: 2-1 Buydowns, Adjustable Rates, and More
Understanding 2-1 Buydown MortgagesA 2-1 buydown mortgage is a type of loan where the interest rate is reduced by a set amount for the first two years of the loan. During the first year, the rate...
Read more

What's Happening in the Mortgage Industry in 2023?
Rising Interest Rates and Their ImpactThe mortgage industry is witnessing a significant shift due largely to rising interest rates. As central banks around the world combat inflation, mortgage...
Read more

NIFA Loan Advantages: Unlocking Opportunities for Homebuyers
Understanding NIFA LoansThe Nebraska Investment Finance Authority (NIFA) loans are a beneficial mortgage option for many, especially first-time homebuyers. While navigating the complex landscape of...
Read more

Navigating the Maze of Mortgage Types
Understanding Different Mortgage TypesWhen it comes to securing a home loan, the array of mortgage types available can be bewildering. Each mortgage type comes with its own set of rules, interest...
Read more

Benefits of Refinancing Your Mortgage
Unlocking Financial Flexibility Through RefinancingRefinancing your mortgage can be an excellent way to achieve more financial flexibility. By replacing your existing mortgage with a new one, you...
Read more

Spring into Homeownership: Tips for Smart Buyers
Spring is synonymous with renewal and new beginnings, making it the ideal season to dive into homeownership. The blossoming flowers and warmer weather coincide with a bustling real estate market...
Read more

Renting vs. Buying: Deciding What’s Right for You
Deciding whether to rent or buy a home is one of the biggest financial choices many people face. Each option comes with distinct advantages and drawbacks, influenced by your financial circumstances...
Read more

HELOC vs Reverse Mortgage: Choosing the Right Option
Leveraging home equity is a popular strategy for securing financial comfort or meeting financial needs in retirement. Making an informed decision between a Home Equity Line of Credit (HELOC) and a...
Read more
Fed's Policy Update: What It Means for Homebuyers
Key Update from the Federal ReserveAn important update emerged from the Federal Reserve’s latest policy meeting on March 19, 2025, which could have meaningful implications for your homeownership...
Read more
Spring into Homeownership: Essential Tips for Buyers
Why Spring is the Ideal Time for HomebuyingSpring brings warmth, renewal, and a flurry of activity in the real estate market. It's an appealing time for buyers, but also highly competitive. Being...
Read more
Understanding Mortgage Preapproval and Interest Rates
The home-buying process can be both exciting and overwhelming. One of the most critical steps in navigating the real estate market is obtaining mortgage preapproval. This foundational step not only...
Read more
Preparing Your Home for Spring
Refreshing Your Space with a Deep CleanSpring is the perfect season to refresh and rejuvenate your home. Start by tackling a deep clean of your living spaces. This includes dusting hard-to-reach...
Read more

Empowering Homeowners: Opportunities for Growth
Understanding Homeownership ChallengesHomeownership is a rewarding accomplishment, but it often comes with a unique set of challenges. Understanding these obstacles is key for homeowners seeking to...
Read more

Maximizing Your Home's Appeal Before Selling
First impressions play a crucial role in the home selling process. When potential buyers arrive, the initial look of your property can make or break their interest. Effectively attracting buyers...
Read more

Tax Perks of Homeownership: Maximize Your Benefits
Beyond the pride of owning a home, there are significant financial advantages that extend into tax season. Navigating these benefits may seem complex, but understanding can deliver substantial...
Read more

Evolution of Mortgage Rates: A Historical Perspective
The history of mortgage rates in the United States is a fascinating journey through economic changes, policy decisions, and market dynamics. Understanding how these rates have evolved provides...
Read more

2025 Residential Housing Market Projections
The residential housing market is set to undergo significant shifts as we approach 2025. For homeowners, sellers, real estate investors, and industry stakeholders, understanding the anticipated...
Read more

How the Economy Influences Mortgage Rates
Understanding the dynamics of mortgage rates is crucial for anyone looking to buy a home or refinance their existing mortgage. One of the most significant factors influencing these rates is the...
Read more

Unlock Savings: The Benefits of Refinancing Your Mortgage
Refinancing your mortgage can be a strategic move that offers several benefits, tailored to fit your financial goals. Here's a breakdown of why you might consider refinancing and how it can work to...
Read more

Mortgage Fun Facts and Surprising Statistics
Mortgages have become a cornerstone of homeownership in America, but how much do we really know about them? Whether you’re a seasoned homeowner or someone just stepping into the world of real...
Read more

Current Mortgage Rates and Housing Market Trends: What You Need to Know
The body content of your post goes here. To edit this text, click on it and delete this default text and start typing your own or paste your own from a different source....
Read more

Refinancing: The Smart Move for Financial Stability
If you're looking to consolidate debt, fund home improvements, or lower your interest rates, refinancing your mortgage can be a powerful financial tool. At Eagle Mortgage Inc., we specialize in...
Read more

Current Real Estate Market in Nebraska and Iowa: A 2024 Update
The real estate market in Nebraska and Iowa has shown dynamic changes in the past year. Whether you’re a real estate agent, a prospective homebuyer, or looking to refinance, staying informed is key...
Read more

Your Guide to Understanding Residential Properties
Understanding Residential Real Estate Residential real estate encompasses property specifically zoned and utilized for living purposes, contrasting starkly with...
Read more

Unlocking the Door to Your Dream Home with VA Loans: A Guide for Veterans and Military Families
At Eagle Mortgage, we're not just in the business of offering loans; we're in the business of making dreams come true. The journey to homeownership might seem daunting for the brave souls who've...
Read more

Opening Doors to Homeownership: How FHA Loans Make Dreams Possible
Dreaming of owning your home but feeling daunted by the hurdles? You're not alone. At Eagle Mortgage, we understand that stepping into homeownership is a monumental life decision, especially for...
Read more

Stepping Up to Your Dream Home: The Ins & Outs of Jumbo Loans
In the journey toward homeownership, some dreams are bigger than others. If your aspirations lead you toward a luxurious home or a property in a high-cost area, a jumbo loan might be your gateway....
Read more
View more
Our Favorie Recipes
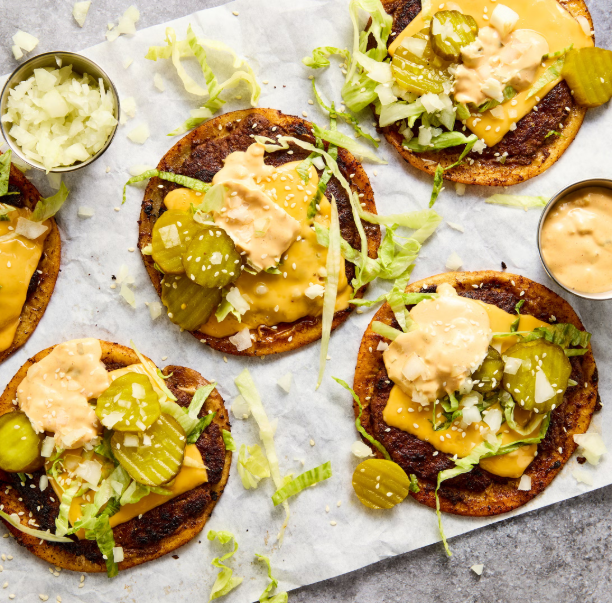
Ingredients: Burger Sauce - 1/4 cup mayonnaise - 2 Tbsp. ketchup - 1 Tbsp. sweet pickle relish - 1 Tbsp. yellow mustard - 1 tsp. hot sauce Smash Burger Tacos - 1 lb. ground beef - 6 (5") flour tortillas - 2 tsp. store-bought or homemade burger seasoning - Kosher salt - 6 Tbsp. neutral oil, divided - 6 slices American cheese, divided - 18 thin bread-and-butter pickle slices - 1 cup shredded iceberg lettuce - 3 Tbsp. chopped yellow onion - White sesame seeds, for serving Directions S Burger Sauce Step 1 - In a small bowl, mix mayonnaise, ketchup, relish, mustard, and hot sauce until combined. Step 2 - Make Ahead: Sauce can be made 3 days ahead. Cover bowl and refrigerate. Smash Burger Tacos Step 1 - Divide beef into 6 portions about 2 1/2 ounces each. Top each tortilla with a portion of beef. Using a fork, flatten beef on top of tortilla into an even layer, leaving a 1/2" border. Sprinkle with 1/2 teaspoon burger seasoning; season with a pinch of salt. Step 2 - In a large skillet over medium-high heat, heat 2 tablespoons oil and swirl pan to coat. Arrange 2 tacos beef side down and press into skillet to flatten with a sturdy spatula or burger press. Cook, undisturbed, until beef is browned and cooked through, 2 to 3 minutes. Flip tacos, top each with a slice of cheese, and cook until cheese is slightly melty, about 1 minute more. Transfer to a baking sheet. Repeat with remaining 4 burger tacos. Step 3 - Top each taco with burger sauce, pickles, lettuce, onion, and sesame seeds.

Ingredients Recipe yields 4 servings - Canola or olive oil cooking spray - 1 1/2 pounds russet potatoes, scrubbed and cut into 1/4-inch-thick wedges - 4 teaspoons neutral oil, such as canola or avocado - 1 1/2 teaspoons Cajun or Creole seasoning, divided - 2 cups cornflakes - ¼ cup all-purpose flour - ¼ teaspoon salt - 2 large egg whites, beaten - 1 pound cod, or haddock, cut into 4 portions For the Coleslaw - 1/2 cup mayonnaise - 2 tablespoons apple cider vinegar - 2 tablespoons maple syrup - 1 teaspoon dijon mustard - 1 teaspoon celery seed - salt and pepper to taste - 16 oz shredded coleslaw mix Directions for cod / fries 1) Position racks in upper and lower third of oven; preheat to 425 degrees F. Coat a large baking sheet with cooking spray. Set a wire rack on another large baking sheet; coat with cooking spray. 2) Place potatoes in a colander. Thoroughly rinse with cold water, then pat dry completely with paper towels. Toss the potatoes, oil and 3/4 teaspoon Cajun (or Creole) seasoning in a large bowl. Spread on the baking sheet without the rack. Bake on the lower oven rack, turning every 10 minutes, until tender and golden, 30 to 35 minutes. 3) Meanwhile, coarsely grind cornflakes in a food processor or blender or crush in a sealable plastic bag. Transfer to a shallow dish. Place flour, the remaining 3/4 teaspoon Cajun (or Creole) seasoning and salt in another shallow dish and egg whites in a third shallow dish. Dredge fish in the flour mixture, dip it in egg white and then coat all sides with the ground cornflakes. Place on the prepared wire rack. Coat both sides of the breaded fish with cooking spray. Bake the fish on the upper oven rack until opaque in the center and the breading is golden brown and crisp, about 20 minutes. Meanwhile, to make the coleslaw: 1) Add the mayonnaise, apple cider vinegar, maple syrup, Dijon mustard, and celery seed to a mixing bowl. 2) Whisk all of the dressing ingredients together until everything is well combined. 3) Drizzle the dressing over the shredded coleslaw mix and toss until everything is well combined at the cabbage is well coated. Tips Easy cleanup: Recipes that require cooking spray can leave behind a sticky residue that can be hard to clean. To save time and keep your baking sheet looking fresh, line it with a layer of foil before you apply the cooking spray.

Ingredients ▢2 pounds lean ground beef ▢1 onion diced ▢1 jalapeño seeded and finely diced ▢4 cloves garlic minced ▢2 ½ tablespoons chili powder divided, or to taste ▢1 teaspoon cumin ▢1 green bell pepper seeded and diced ▢14.5 ounces crushed tomatoes 1 can ▢19 ounces canned red kidney beans drained and rinsed ▢14.5 ounces canned diced tomatoes with juices ▢1 ½ cups beef broth ▢1 cup beer ▢1 tablespoon tomato paste ▢1 tablespoon brown sugar optional ▢salt and black pepper to taste Instructions Combine ground beef and 1 ½ tablespoons chili powder. In a large pot, brown ground beef, onion, jalapeno, and garlic. Drain any fat. Add in remaining ingredients and bring to a boil. Reduce heat and simmer uncovered 45-60 minutes or until chili has reached desired thickness. Top with cheddar cheese, green onions, cilantro or other favorite toppings. Serving size: 1 1/2 cups Beer can be replaced with extra broth. Any ground meat will work in this recipe. Optional toppings: sour cream, red or green onion, cheese, jalapenos, cilantro, avocado & lime wedges, tortilla chips Nutrition Information Calories: 395 | Carbohydrates: 27g | Protein: 29g | Fat: 17g | Saturated Fat: 6g | Cholesterol: 77mg | Sodium: 283mg | Potassium: 1066mg | Fiber: 7g | Sugar: 6g | Vitamin A: 870IU | Vitamin C: 26.2mg | Calcium: 86mg | Iron: 6.2mg
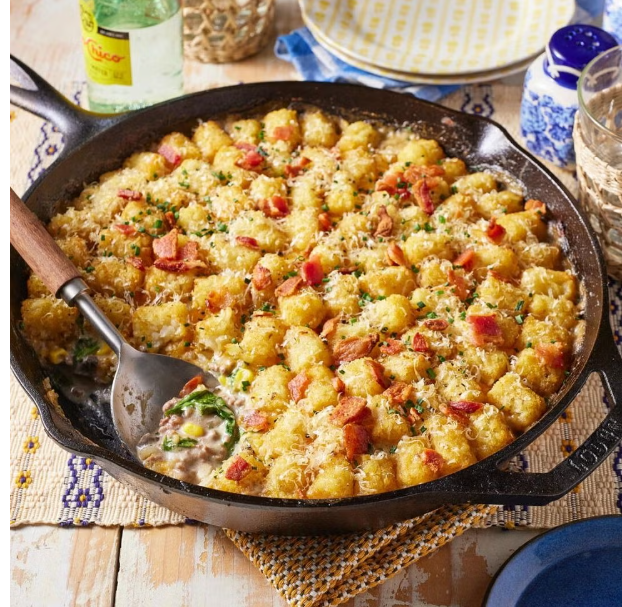
Ingredients - 1 (32-oz.) bag of tater tots - 4 strips of bacon (about 3 oz.) - 1/2 yellow onion, chopped - 2 cloves garlic, chopped - 1 lb. ground sirloin - 1 (10.75-oz.) can cream of mushroom soup - 3/4 cup milk - 1/2 tsp. salt - 3/4 tsp. ground black pepper, divided - 3 cups baby spinach, roughly chopped - 1 cup frozen corn - 8 oz. shredded cheddar or colby jack cheese - 1/4 cup grated parmesan cheese - Chopped chives or scallions, for topping Directions 1 Preheat the oven to 375˚F. Remove the tater tots from the freezer to let them thaw slightly while you prepare the filling. 2 Heat a large cast-iron skillet over medium heat. Add the bacon and cook until golden brown and extra crispy, 6 to 8 minutes. Remove to a paper towel-lined plate, leaving the grease in the skillet. 3 Add the onion to the skillet with the grease and cook until slightly softened, about 4 minutes. Add the garlic and cook 1 minute more. Add the ground beef and cook, breaking it into small pieces with a wooden spoon, until no pink pieces remain, 6 to 8 minutes. Drain off the excess fat, if you like. Remove the skillet from the heat. Stir in the soup, milk, salt, and ½ teaspoon black pepper; mix until smooth. Fold in the spinach to wilt slightly. Stir in the corn. 4 Sprinkle the cheddar cheese evenly over the top of the casserole. Place the tater tots on top in a single layer, arranging them in concentric circles (or just toss them on and push them very close together). Sprinkle the top with the parmesan cheese and the additional 1/4 teaspoon of black pepper. 5 Bake until he tater tots are golden, 30 to 35 minutes. Remove from the oven and crumble the cooked bacon over top. Let rest 5 minutes. Top with chopped chives or scallions and serve.
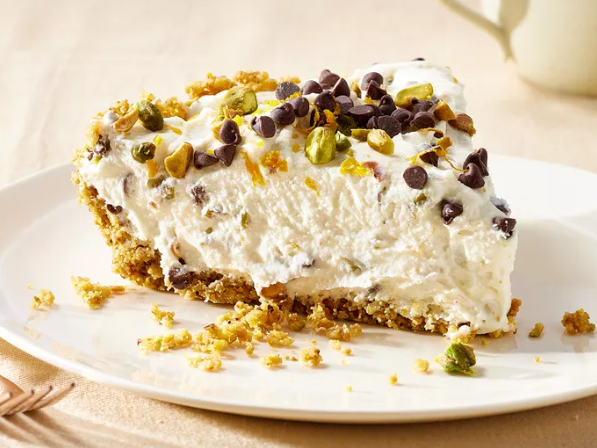
The Prep Time: Additional Time: Total Time: Servings: Yield: 20 mins 4 hrs 4h rs 20 mins 1 0 1 (9-inch) pie Crust: - 8 waffle cones, slightly crushed - 1/2 cup roasted pistachios - 1 tablespoon granulated sugar - 7 tablespoons unsalted butter, melted - cooking spray Filling: - 1/4 cup salted roasted pistachios, plus chopped pistachios for garnish - 1½ cups whole milk ricotta - 1 cup mascarpone cheese - 1 cup unsifted powdered sugar - 1 /2 cup miniature semisweet chocolate chips, plus more for garnish - 2 teaspoons grated orange zest, plus more for garnish - 1 teaspoon vanilla extract - 1/4 teaspoon kosher salt - 1 cup heavy whipping cream Directions: - Gather all ingredients. - To make the crust: Pulse waffle cones, pistachios, and sugar in a food processor until mixture is finely ground, about 20 (1-second) pulses. Add butter, and pulse until mixture holds together when squeezed, about 10 (1-second) pulses, stopping to scrape down sides as needed. - Lightly coat a 9-inch deep-dish pie plate with cooking spray, and transfer waffle cone mixture to prepared pie plate, pressing evenly into bottom and up sides of pie plate. Freeze crust, uncovered, until set, about 15 minutes. - Meanwhile, to make the filling: - Finely chop pistachios, and transfer to a medium bowl. Add ricotta, mascarpone, powdered sugar, chocolate chips, orange zest, vanilla, and salt. Stir until combined, and set aside at room temperature. - Beat heavy cream with an electric mixer on medium-high speed until medium peaks form, 2 to 3 minutes. Spoon whipped cream into ricotta mixture, and gently fold until just combined. - Spoon ricotta mixture into prepared Crust, and spread in an even layer with a rubber spatula or offset spatula. Cover with plastic wrap, and refrigerate, uncovered, until set, at least 4 hours or up to 8 hours. - Remove pie from refrigerator; remove plastic wrap, and garnish with additional chopped pistachios, chocolate chips, and orange zest. Nutrition Facts (per serving) 664 50g 46g 11g Calories Fat Carbs Protein
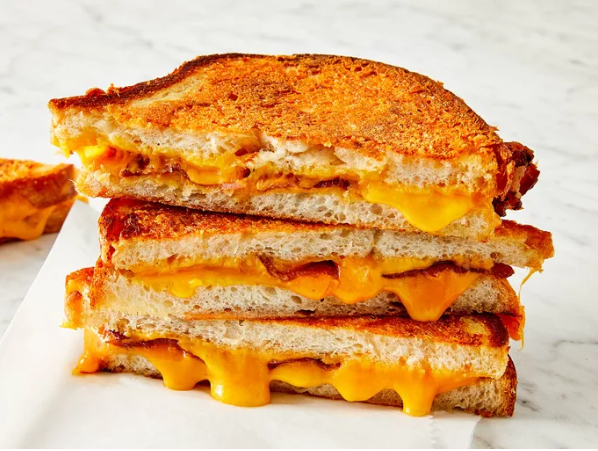
Prep Time: Cook Time: Total Time: Servings: 10 mins 6 mins 16 mins 4 Ingredients: - ¼ cup butter, softened - 1 cup freshly grated Parmigiano-Reggiano cheese - 8 slices cooked bacon - 4 slices Cheddar cheese - 8 slices sourdough bread Directions 1) Mash together butter and Parmesan cheese in a small bowl until evenly blended. 2) Make sandwiches by placing two slices of bacon and one slice of Cheddar cheese on half of the bread slices. Top with the remaining slices of bread. 3) Heat a large skillet over medium heat. Spread some of the butter mixture on the top of each sandwich. Place sandwiches butter side down in the skillet. Spread the remaining butter mixture on the other sides. Cook until golden brown on each side, about 3 minutes per side. To serve, cut in half diagonally. Nutrition Facts (per serving) 510 Calories 32g Fat 30g Carbs 27g Protein

This is the easiest recipe you will ever make! With only 2 ingredients, this is a yummy fall favorite treat for your family! Ingredients: 1 can pumpkin puree 1 package chocolate chip cookie mix (dry) Directions: Preheat oven to 350 degrees Mix ingredients together Get an ice cream scoop to put cookies on a cookie sheet or put in an 8x8 baking dish Cook for 25 minutes (or according to package instructions) and enjoy!
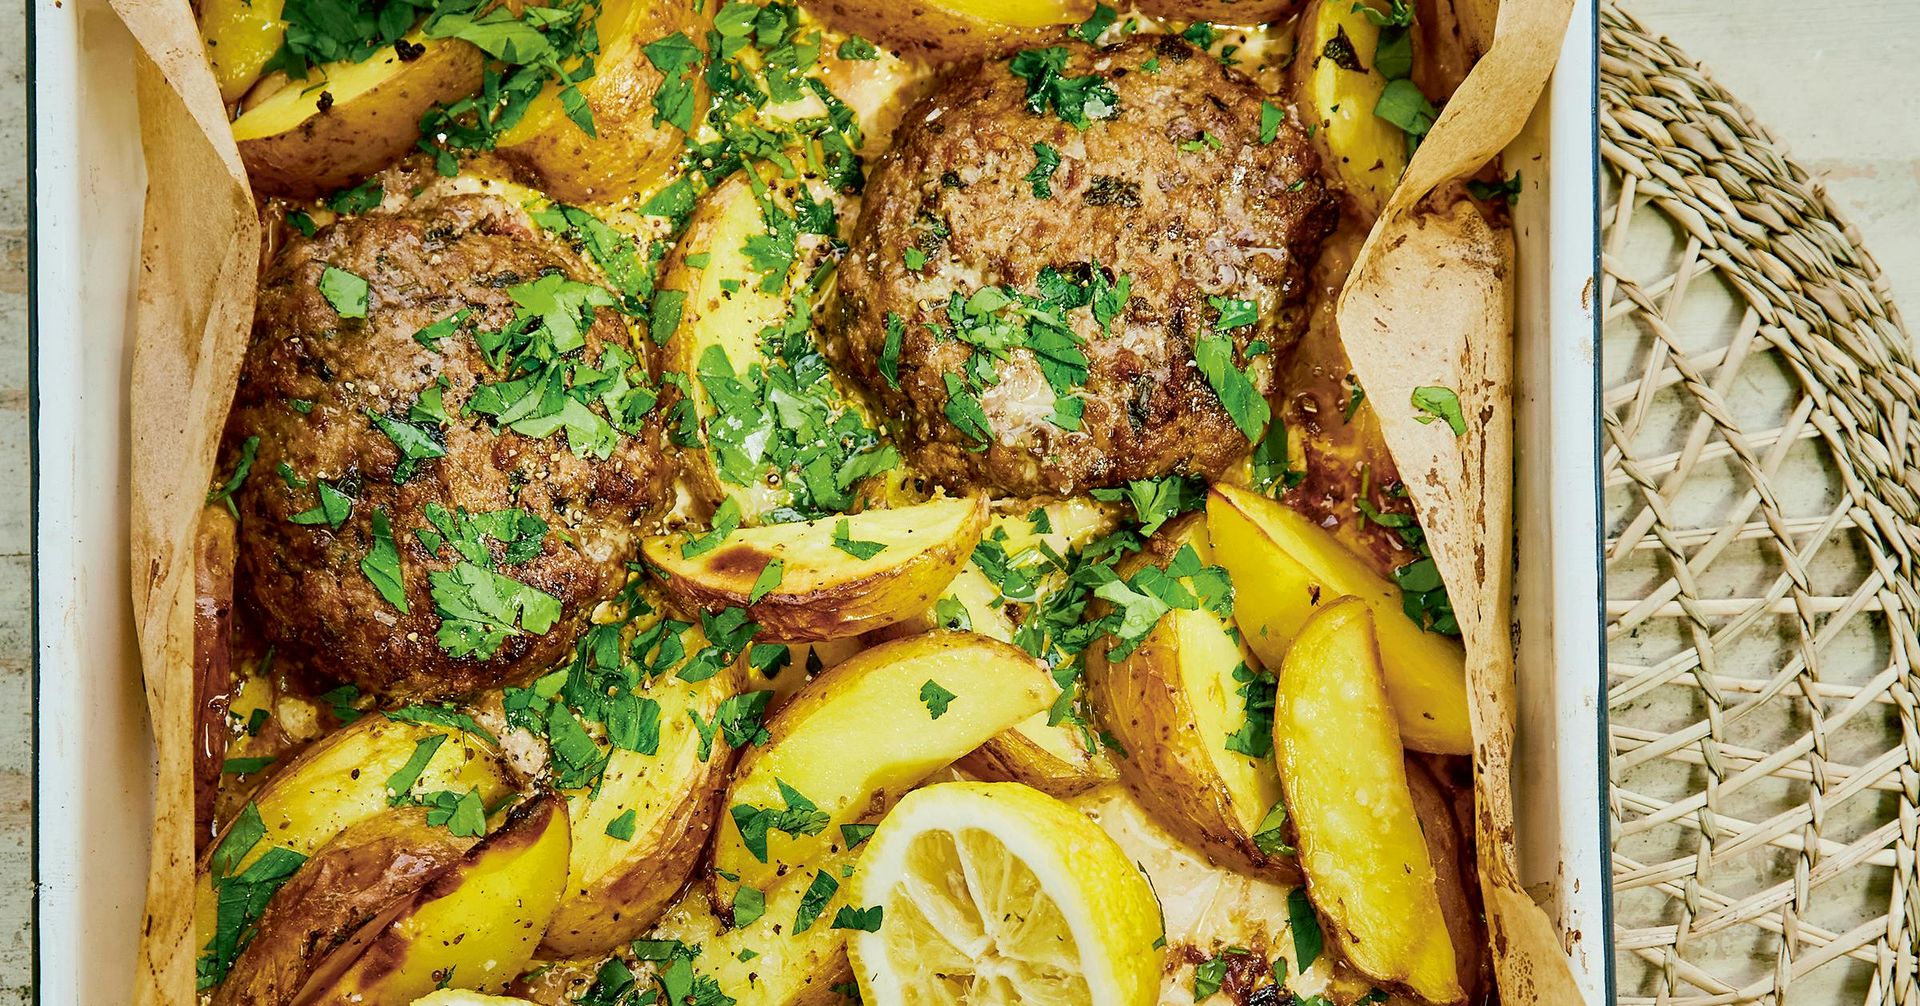
Greek version of the classic beef burger for your whole family!

Prep Time Cook Time Total Time 20 minutes 10 minutes 30 minutes Ingredients 3 oz prosciutto ⅓ cup pine nuts Salad ingredients 3 yellow peaches (medium-size) 8 oz fresh Mozzarella cheese (large balls) 2 oz fresh basil shredded Dressing ⅓ cup balsamic glaze or reduction (see note below) US Customary - Metric Instructions Cook prosciutto - Preheat the oven to 350 F. - Spread Prosciutto in a single layer on a parchment paper-lined baking sheet. - Toast for about 10 minutes or more until crispy. Remove from oven. - Toast pine nuts - Toast pine nuts on a separate baking sheet for about 5 minutes in the preheated oven at 350 F. Watch the nuts carefully to make sure they don't burn. How to prepare peaches and slice them into rounds - Wash peaches really well with warm running water to remove any dirt or debris. You don't need to peel the peaches. - Hold the peach down on a counter (not in the air) and use a small knife to cut down into the flesh until it hits the pit (starting at the top of the stem where the natural indent is). Continue to cut all the way around until it reaches the other side. Set aside the knife. - Hold each half of the peach with your hands and move each half away from each other gently, twisting, until the 2 halves are separated. One of the halves will have a pit attached to its center - remove it with your fingers, using small motions. This is why you want peaches that are somewhat soft. Peaches are soft, so you don't need a super sharp knife. Be careful and don't cut yourself. Don't cut peaches while holding them in the air. Hold them down steady on a counter with one hand, and use the knife in the other hand. Be aware of your fingers and don't' cut yourself. Once you have 2 pitted peach halves, slice each half into rounds. Some rounds will have a hole in the middle. Prepare Mozzarella Slice fresh Mozzarella cheese into rounds or slice them into squares to fit the peach slices. Assembly - Layer rounds of peaches on a large plate or on several small serving plates. - Top with rounds or squares of sliced fresh Mozzarella cheese. - Top with shredded fresh basil on top of the Mozzarella and around the peaches. - Layer crispy prosciutto around the peaches. - Sprinkle with the balsamic glaze or reduction. - Top with toasted pine nuts. Notes Note about yellow peaches. Make sure to purchase yellow peaches (not white) as they make a beautiful presentation. Choose peaches that have a soft texture (but not mushy) - peaches should be soft and have some give to them. If peaches are too hard, they will be difficult to slice. Wash peaches really well with warm running water to remove any dirt or debris. Grill peach halves if you like for more flavor and a beautiful presentation! Homemade balsamic glaze. Make the balsamic glaze by cooking down the balsamic vinegar together with a small amount of honey or brown sugar until the mixture reduces by about half. For example, combine 1 cup of balsamic vinegar + ¼ cup of honey or brown sugar and cook it down. Consistency should be thick enough to coat the back of the spoon but should not be overly thick. Use store-purchased balsamic glaze. It is sold in the same aisle as regular balsamic vinegar and/or olive oil. Drizzle with a very high-quality aged balsamic vinegar made in Italy. Aged balsamic vinegar is often sold in specialized stores or sections of foreign foods at some grocery stores. It has a thick, syrupy consistency, different from regular balsamic vinegar. Just use it as is. And, you don't need to use much. Or, use your favorite balsamic vinaigrette-based salad dressing.

Prep Time: 30 Min | Inactive Time: 2 hour | Total Time : 2 hours and 30 minutes Ingredients 2 - 12 oz bakery pound cakes, cut into one inch cubes 1 - recipe homemade glaze (recipe below) or 2 - cups store bought strawberry glaze 1 - 16 oz container fresh strawberries, chopped and separated 1/2 - pint fresh blueberries 1/2 - pint raspberries Homemade Strawberry Glaze 2 - cups sugar 2 - cups water 6 - tablespoons cornstarch 6 - tablespoons strawberry gelatin (Jell-O) Cream Filling 4 - ounces cream cheese, softened 1 - 16 oz container heavy whipping cream 1 - teaspoon vanilla extract 1/2 - cup powdered sugar Instructions: If using homemade strawberry glaze, prepare the glaze first so it has sufficient time to cool. If using store bought glaze omit this step (I used homemade glaze). 1) Cut the pound cake into one inch cubes and arrange in a 13 x 9 inch baking pan. 2) Add the strawberry glaze over the pound cake and spread evenly. Sprinkle about 1 1/2 cups chopped strawberries over the glaze. 3) Prepare the whipped cream filling, by whipping the heavy cream slowly until the cream is lightly thickened and soft peaks start to form. 4) In a seperate bowl, add the softened cream cheese and whip until creamy. Add the vanilla extract and powdered sugar and mix to combine. 5) Add the cream cheese mixture to the heavy whipping cream, and continue whipping until the cream forms semi stiff peaks. 6) Drop the whipped cream mixture by dollops over the strawberry glaze and spread evenly to cover the glaze completely. 7) Add the fresh blueberries, raspberries and remaining chopped strawberries. 8) Refrigerate cake for at least 2 hours before serving. Refrigerate any leftovers. To make the Homemade Strawberry Glaze: In a medium saucepan, combine sugar, water, and cornstarch. Cook over medium high heat until it boils and thickens. You will know the mixture is thick enough when it coats the back of a spoon. Remove glaze from heat, add gelatin, and mix to combine using a wire whisk. Cool glaze before using. To cool the glaze quickly I place the whole pot into a bowl of ice water and whisk until it cools down and thickens.

Prep Time: Total Time: Servings: 15 mins 15 mins 8 Ingredients: - 1 cup mayonnaise - ¼ cup white sugar or to taste - 4 teaspoons white wine vinegar - ½ teaspoon dried dill weed - ½ teaspoon seasoned salt or to taste - 4 medium cucumbers, peeled and sliced Directions: Stir mayonnaise, sugar, vinegar, dill, and seasoned salt together in a large bowl until sugar has dissolved. Stir in cucumber slices, tossing to coat. Nutrition Facts (per serving) 237 22g 11g 1g Calories Fat Carbs Protein

Prep Time: Total Time: Servings: 5 mins 5 mins 6 ½ cup mayonnaise 2 tablespoons white sugar or to taste 1 ½ tablespoons lemon juice 1 tablespoon vinegar ½ teaspoon ground black pepper or to taste ¼ teaspoon salt or to taste Gather all ingredients Whisk mayonnaise, sugar, lemon juice, vinegar, pepper, and salt together in a bowl until smooth and creamy Add to your favorite coleslaw mix! Nutrition Facts (per serving) 142 Calories 14g Fat 5g Carbs 0g Protein