Licensed in NE and IA

The logo for eagle mortgage inc. has an eagle on it.

No Bake Pumpkin Cheesecake

Liz Gibbs • October 25, 2024

This is a subtitle for your new post

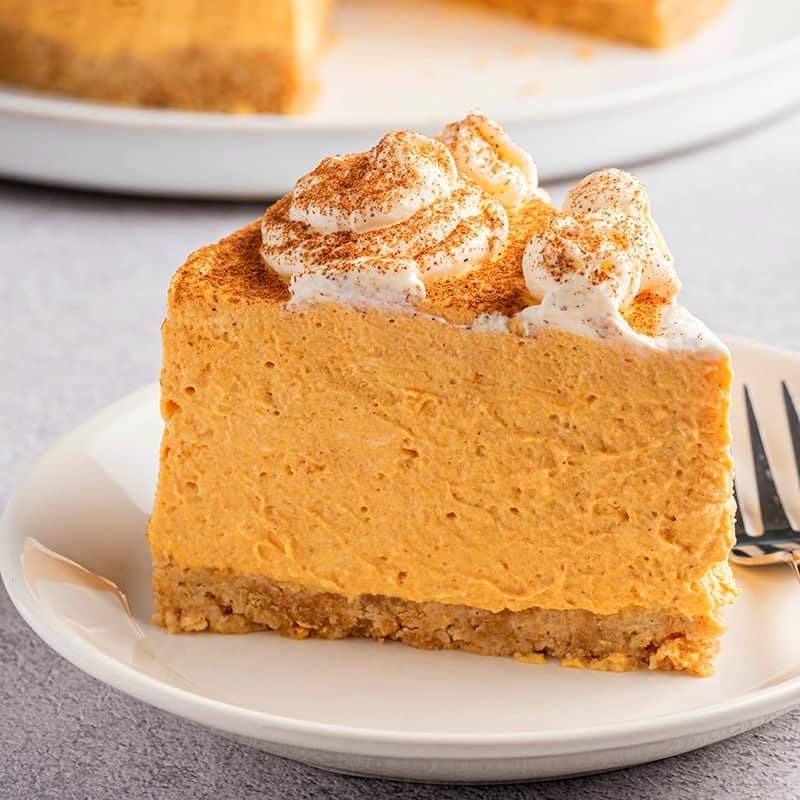
No-Bake Pumpkin Cheesecake

Prep Time

30 mins

Chill Time

8 hrs

Total Time

8 hrs 30 mins

Servings

10 to 12 servings

Yield

1 (10-inch) cheesecake

Ingredients

For the gingersnap crust

  • 2 cups (200g to 250g) gingersnap crumbs or graham cracker crumbs1/3 cup (67g) granulated sugar1/2 cup (113g) unsalted butter, melted

For the pumpkin cheesecake filling

  • 1 (15-ounce) can pumpkin purée1 cup (240ml) heavy cream2 (8-ounce) packages cream cheese1 cup (120g) powdered sugar2 tablespoons molasses1 teaspoon vanilla extract1 1/2 teaspoons ground cinnamon1 teaspoon ground ginger1/4 teaspoon ground nutmeg1/4 teaspoon ground cardamom1/8 teaspoon ground cloves

For the optional toppings

  • 1 cup heavy cream2 tablespoons powdered sugar1 teaspoon vanilla extractCaramel sauce


Method

  1. Drain the pumpkin:
  2. Use a spatula to scrape the pumpkin purée out of the can and into a small bowl lined with a couple of layers of paper towels. Set aside while you prepare the crust and the whipped cream. 
  3. The paper towels will draw some water out of the pumpkin purée for a thicker cheesecake filling.


Make the no-bake crust:

In a large bowl or food processor, combine the cookie crumbs, sugar, and melted butter with a silicone spatula until all the crumbs are evenly moistened and the mixture begins to clump together.

Transfer the crumb mixture into a 9 or 10-inch springform pan. Use your hand or the bottom of a measuring cup to pack the crumbs into an even layer on the bottom of the pan and slightly up the sides. Compact the crust firmly to prevent it from being too crumbly.

Transfer the pan to the freezer to chill while preparing the filling.


Whip the cream:

In the bowl of a stand mixer fitted with a whisk attachment, or in a large mixing bowl with a hand mixer, whip the heavy cream on medium-high speed until thickened and very stiff peaks form, about 1 to 2 minutes.  Transfer the whipped cream to a small bowl and set aside.


Whip the cream cheese:

In the same bowl used for the whipped cream, whip the cream cheese on medium-high speed until completely smooth, about 4 minutes. Pause a few times to scrape the sides and bottom of the bowl with a spatula to ensure all of the cream cheese is whipped and smooth.


Make the filling:

To the whipped cream cheese, add the drained pumpkin purée, powdered sugar, molasses, vanilla, cinnamon, ginger, nutmeg, cardamom, and cloves. Mix on the lowest speed until most of the powdered sugar has been incorporated into the mixture, about 1 minute. Increase the speed to medium-high and whip for 2 to 3 minutes, or until the filling is creamy and perfectly smooth. Pause and scrape the bowl a few times during mixing to ensure the filling is free of any lumps.


Fold in the whipped cream:

Use a silicone spatula to gently fold the whipped cream into the pumpkin mixture. As you mix, rotate the bowl and use the spatula to scrape the sides and bottom of the bowl and stir in gentle, sweeping motions to prevent deflating the air in the whipped cream.


Fill and chill:

Remove the crust from the freezer and fill it with the pumpkin mixture. Use a small offset spatula, or the silicone spatula, to level and smooth the top of the cake. Cover the pan tightly with a layer of plastic. Try to avoid letting the plastic touch the surface of the cake. Refrigerate until thoroughly chilled and the filling has set, at least 8 hours, ideally 12 to 24 hours.

  1. Remove from the pan:
  2. When the cake is set and you’re ready to decorate and serve, run a small offset spatula or a butter knife around the edge of the cake. Remove the rim of the pan. Carefully slide the cake onto a serving plate, or serve it directly from the pan.


Make the whipped cream topping (optional):

  1. In the bowl of a stand mixer fitted with a whisk attachment, or in a large mixing bowl with a hand mixer, whip the heavy cream, powdered sugar, and vanilla on medium-high speed until stiff peaks form, about 1 to 2 minutes. The cream should thicken, and when you pull the whisk out of the bowl, the peak should stand up.
  2. Transfer the whipped cream to a piping bag fitted with a large star tip. Pipe large rosettes around the top of the cake and drizzle the cake with caramel sauce, if using. Slice and serve.
  3. Leftover cheesecake can be stored covered in the refrigerator, covered, for up to 3 days.


January 24, 2025
Prep Time Cook Time Yield 15 min 15 min 2 loaves (4 servings each) Ingredients: - 1 pound ground beef - 1/2 cup sour cream - 1/2 cup chopped onion - 1/4 teaspoon salt - 3 cups frozen chopped broccoli - 1/4 teaspoon pepper - 1 cup shredded part-skim mozzarella cheese - 2 tubes (8 ounces each) refrigerated crescent rolls Directions: 1) Preheat oven to 350°. In a large skillet, cook beef and onion over medium heat 6-8 minutes or until beef is no longer pink, breaking beef into crumbles; drain. Stir in broccoli, cheese, sour cream, salt and pepper; heat through. 2) Unroll 1 tube of crescent dough onto a greased baking sheet; form into a 12x8-in. rectangle, pressing perforations to seal. Spoon half the beef mixture lengthwise down center of rectangle. 3) On each long side, cut 1-in.-wide strips at an angle, from the edge to about 3 in. into the center. Fold 1 strip from each side over filling and pinch ends together; repeat. 4) Repeat with remaining ingredients to make second braid. Bake 15-20 minutes or until golden brown. Nutrition Facts 2 pieces : 396 calories, 23g fat (6g saturated fat), 48mg cholesterol, 644mg sodium, 29g carbohydrate (8g sugars, 2g fiber), 20g protein. recipe from Taste of Home - https://www.tasteofhome.com/recipes/broccoli-beef-braids/#RecipeCard
December 23, 2024
Prep time Cook time Serves 15 minutes 1 hour 2 minutes 4 to 6 Ingredients 3 cloves garlic 3 to 4 large lemons, divided 1 medium red bell pepper 2 pounds Yukon gold potatoes 1/4 cup plus 1 tablespoon olive oil, divided 1 tablespoon dried oregano 1 1/2 teaspoons kosher salt, divided 3/4 teaspoon freshly ground black pepper, divided 2 pounds bone-in, skin-on chicken thighs (4 to 6) 1/2 to 3/4 cup low-sodium chicken broth 1/2 medium bunch fresh dill or parsley, or a combination 3 ounces feta cheese (optional) Instructions 1) Arrange a rack in the middle of the oven and heat the oven to 400ºF. 2) Prepare the following, adding each to the same large bowl as you complete it: Mince 3 garlic cloves. Juice 2 to 3 of the large lemons until you have 1/3 cup. Cut 2 pounds Yukon gold potatoes into 1-inch wedges. Trim and cut 1 medium red bell pepper into 1-inch pieces. 3) Add 1/4 cup of the olive oil, 1 tablespoon dried oregano, 1 teaspoon of the kosher salt, and 1/2 teaspoon of the black pepper. Toss to evenly coat the potatoes and pepper. 4) Cut the remaining 1 large lemon into 6 wedges. Pat 2 pounds bone-in, skin-on chicken thighs dry with paper towels. Season all over with the remaining 1/2 teaspoon kosher salt and 1/4 teaspoon black pepper. 5) Heat the remaining 1 tablespoon olive oil in a large (at least 12 inch) cast iron or oven-safe skillet over medium-high heat until shimmering. Add the chicken skin-side down in a single layer. Cook until the fat is rendered and the skin is crisp and golden brown, about 12 minutes. Transfer the chicken to a plate skin-side up in a single layer (the chicken will not be cooked through at this point). 6) Add the potato mixture and any liquid at the bottom of the bowl to the skillet and stir to coat in the pan drippings. Arrange into an even layer. Pour 1/2 cup of the low-sodium chicken broth over the top. Nestle the lemon wedges and chicken skin-side up into the potatoes. Pour in any accumulated juices on the plate. 7) Transfer the skillet to the oven. Roast until the chicken is cooked through and the potatoes are tender and browned in spots, 40 to 50 minutes. If the skillet becomes too dry, add the remaining 1/4 cup low-sodium chicken broth. 8) Let the chicken and potatoes rest for 5 minutes. Meanwhile, coarsely chop the leaves and tender stems from 1/2 medium bunch fresh dill or parsley until you have about 1/2 cup. 9) Crumble 3 ounces feta cheese over the chicken if desired (about 1/3 cup). Sprinkle with the herbs. By Rachel Perlmutter
December 2, 2024
Refinancing your mortgage is more than just a way to lower your interest rate—it’s a versatile financial strategy that can open doors to new opportunities. Whether you're looking to build long-term financial security, create a safety net for unexpected expenses, or achieve a specific life goal, refinancing offers numerous possibilities. Here are some unique ways refinancing can help you take control of your financial future. Build Equity Faster For homeowners who want to pay off their mortgage sooner, refinancing into a shorter loan term, such as moving from a 30-year to a 15-year mortgage, can be a game changer. While this approach may increase your monthly payments, it can significantly reduce the total interest paid over the life of the loan and help you build equity in your home more quickly. Faster equity growth also provides added financial security, giving you more options for future borrowing or home sales. Stabilize Your Monthly Payments If you currently have an adjustable-rate mortgage (ARM), refinancing into a fixed-rate mortgage can provide stability in your monthly payments. Fixed-rate mortgages protect you from interest rate fluctuations, offering predictability in your budget—especially valuable in an uncertain economic climate. This switch can help you plan better for the long term without worrying about rising rates. Tap Into Your Home’s Value with a Cash-Out Refinance A cash-out refinance allows you to access the equity in your home for a lump sum of cash. This option is ideal for homeowners looking to fund significant expenses like starting a business, paying for college tuition, or even creating an emergency fund. While it does increase your mortgage balance, it often comes with lower interest rates compared to personal loans or credit cards, making it a cost-effective way to finance large expenses. Plan for Retirement As you approach retirement, refinancing can be a strategic move to align your mortgage with your future financial needs. For instance, if you’re looking to reduce monthly expenses, refinancing to a lower interest rate or extending your loan term could free up cash for other retirement goals. Alternatively, a cash-out refinance could provide funds for investments or healthcare costs, ensuring you’re financially prepared for this new chapter of life. Is Refinancing Right for You? Every homeowner’s situation is unique, and refinancing isn’t a one-size-fits-all solution. It’s essential to consider your financial goals, current mortgage terms, and the costs associated with refinancing. Working with an experienced mortgage professional can help you weigh the pros and cons to make the most informed decision. Why Choose Eagle Mortgage Inc.? At Eagle Mortgage Inc., we understand that refinancing is more than just a transaction—it’s an opportunity to improve your financial outlook. Our team of experts is here to guide you through every step of the process, helping you tailor a refinancing solution that aligns with your goals.  Whether you’re looking to save on interest, fund life’s milestones, or simply take charge of your finances, we’re here to help. Contact us today to explore refinancing options designed to meet your needs and maximize the potential of your home.
Show More
Share by: